
Blanche is an eCommerce and portfolio WordPress theme that will make your website stand out from the crowd. Packed with features and with its modern design will enable you to create your eCommerce or portfolio website very quickly.
Theme installation
Unzip file blanche_unzip_first.zip that you downloaded from us and install blanche.zip file. Read more how to install a theme →
Making theme look like demo
Inside the package you will find a file named blanche.WordPress.xml that you can use to import the demo content. Read more how to make theme look like the demo →
Activate child theme
This theme enables you to create and activate a child theme with just one click, which is the recommended way to modify themes. Learn how to create a child theme →
Adding a logo image
Go to Appearance → Customize → Site Identity to add a logo image or edit your site title. Learn how to update your site identity →
Setting up the menu
This theme has two menu locations, the Primary Menu (main menu) and Social (the menu to display your social media profiles). Create menus and assign them to each of the available locations. Learn how to setup WordPress menus →
Social media icons
This theme will automatically display links to your social media profiles as icons, using a Custom Menu. Learn how to setup social media menu →
Header video and image
First add a header image. In your Dashboard go to Appearance → Customize → Header Images. Add the image you want to display. You can add more than one and randomize them.
Note that even though you opt to go with a video, background videos will not autoplay in mobile devices, to preserve data. That is why the theme will fall back to the header image if viewed in mobile.
To add a YouTube video in the header, in your Dashboard go to Appearance → Customize → Theme Options, and you will see a field to add the YouTube video url. Add the full url, like below
https://www.youtube.com/watch?v=pSOoXLRBDuk
You will also see an option to mute the video.
Top widget
As you can see in our demo, on top of the video, there is a block of text with a call to action button. You can achieve that by adding a text widget or any other widget type to the Top Widget location. In your Dashboard go to Appearance → Widgets and add a widget to this location. Learn how to add widgets →
Call to action button
To have a call to action button like in our demo here’s the html code that you can use
<a class="dbutton" href="enter the url here"><span data-hover="Some text">Some text</span></a>
You can use this code to add a button in text widgets, pages and anywhere you want in your website.
Configuring the front page
In the front page below the header image, this theme will display the latest posts by default. You can assign a static page to display in front instead of the latest posts. Learn how to display a static page in front →
This way you can have the Home Page template, a default page, that is a page with a right sidebar, a full width page or your portfolio display in front, instead of the latest posts.
Home page template
This theme comes with a custom made template to create an attractive and very functional home page, just like in our demo.
- Create a page and assign the Home Page template to it. Learn how to change page templates →
- Add a featured image to this page, which will be resized to 2000x600px.
- Assign this page to display in the front of your website Learn how to display a static page in front →
- Note that the content with the featured image of this page will display in the bottom section of the home page.
At the top of the Home Page template there is a widget location named Front Widget. In your Dashboard go to Appearance → Widgets and add a text widget or any other widget type to this location. Learn how to add widgets →
If you have WooCommerce installed and activated, below the Front Widget will appear WooCommerce product categories. Add an image (thumbnail) to each product category, suggested size is 600x400px. You can add a thumbnail in the bottom of the screen when you edit a WooCommerce product category.
Alternatively you can have featured content instead of WooCommerce product categories. In your Dashboard go to Appearance → Customize → Theme Options and check the box to Display featured content instead of WooCommerce categories. If you are not going to use WooCommerce, the theme will automatically display featured content.
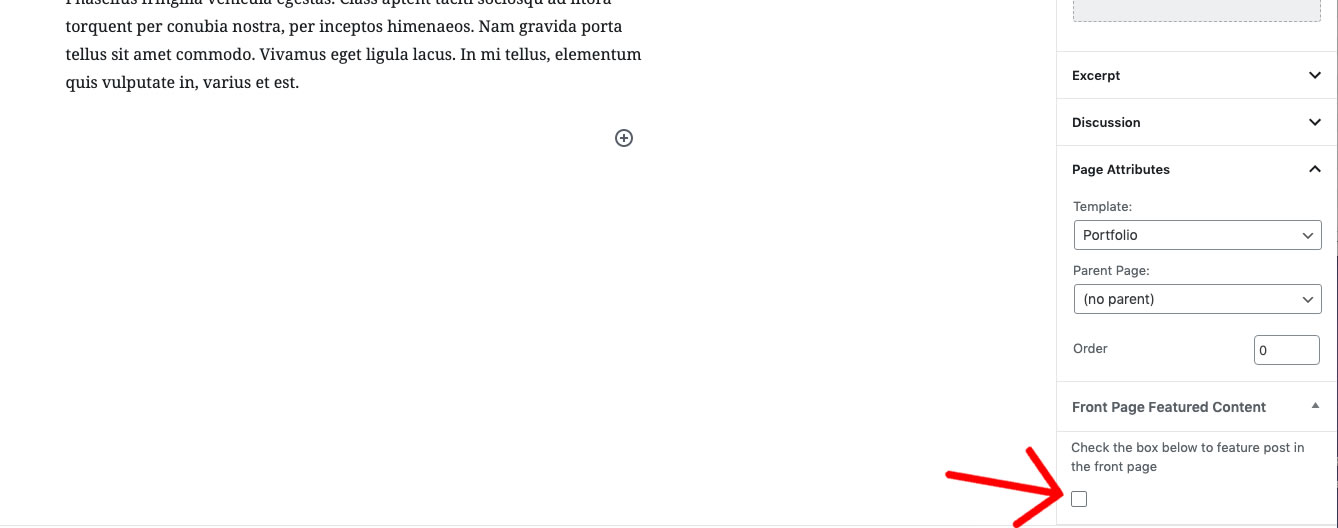
To feature a page or post, in the bottom of the right column in the editor, check the box to Feature post in the front page. Add a featured image which will be resized at 600x400px.

Below featured categories, there is a featured content carousel in the Home Page template. If WooCommerce is installed and activated, the carousel will automatically display featured products. You can feature products by highlighting the ‘★‘ icon in the right of each product when viewed as list, by going to Products → All Products in your Dashboard.
Alternatively you can have featured portfolio entries instead of WooCommerce featured products. In your Dashboard go to Appearance → Customize → Theme Options and check the box to Display portfolio instead of featured products in carousel. If you are not going to use WooCommerce, the theme will automatically display featured portfolio entries in the carousel.
To add a portfolio entry to the carousel just add the tag featured to any portfolio entry.
Portfolio
The portfolio will display the entries in a beautiful masonry style, adjusted automatically, in three different sizes. This depends entirely on the orientation of the featured image uploaded to each portfolio entry.
Landscape featured images will be resized to 800x400px.
Portrait featured images will be resized to 400x800px.
Square featured images will be resized to 400x400px.
First create a page. Assign the Portfolio template to the newly created page. Learn how to change page templates →
Add the page to the menu or have it display in the front page as explained above.
- In your Dashboard go to Portfolio → Add New.
- Add a featured image to each portfolio entry. Learn how to add featured images to a page or post →
- Inside each portfolio entry you can display images in the right side of the content by attaching images to the portfolio entry. Learn how to attach images to a page or post →
WooCommerce
The theme does not need any special settings for WooCommerce, it is setup to work out of the box.
To achieve the hover effect that changes the image on rollover you need to add at least a gallery image to each product.
If you need help to get started with WooCommerce, here is a tutorial.
Infinite scroll
Infinite scroll displays an Older Posts button instead of the default post navigation. To use this feature you need to install the Jetpack plugin.
- In your Dashboard go to Plugins → Add New and search for Jetpack plugin, install and activate it.
- In your Dashboard go to Jetpack → Settings.
- Under Writing section check the radio button to Load more posts with a button or as the reader scrolls down.
Page templates
- Home Page: Custom page to display in front.
- Default: Content page with right sidebar.
- Full width: Full width page, no sidebar.
- Portfolio page: Page to display portfolio entries.
Widgets
- Right sidebar: Visible in default pages, blog and single posts.
- Top Widget: Visible in the front page on top of the video.
- Front widget: Visible in the Home Page template, below the header.
- Footer widgets: Visible throughout the website, in the footer.
Featured Images sizes
- Header image: 2000 x 600px
- Blog featured images: 720px wide with unlimited height
- Featured categories: 600 x 400px
- Carousel images: 400 x 400px
- Portfolio landscape: 800 x 400px
- Portfolio portrait: 400 x 800px
- Portfolio square: 400 x 400px
If you need more help regarding this theme, please contact us.